Zabbix- A Simpler way of Monitoring
Today, applications have evolved from standalone to the client-server model and ultimately to the cloud-based elastic application. Application performance can directly affect a business, hurting the revenue as customer struggle to complete the process. It’s always been difficult to see what’s going on inside the system. And doing so has become an essential part. Having a good monitoring tool will help us to understand the system status and determine when they are behaving normally and when they are behaving abnormally. When something goes wrong, the tool alerts quickly and then we can act on it and fix it without affecting customers. Zabbix is a well-known tool to do that for you.
Why do we need Application Monitoring?
- Information gathering
Large application produces a humongous number of data that should be monitored and analyzed for the performance and improvement of product and thereby better business.
- Around the clock monitoring
Humans will never be able to monitor each server 24 X 7. But it is very crucial that any unexpected incident on the servers should be notified and act on it immediately.
- Pre-emptive Alerting
Monitoring tool is an invisible team member who will alert you about unexpected things in the system.
What is Zabbix?
Zabbix is an open source, real-time application, and network monitoring tool. It offers monitoring of thousands of metrics collected from physical machines or virtual machines. Zabbix has a web-based management interface which is centralized through a database. With Zabbix, visualization of your data is available in the form of graphs, screens, maps and overviews.
Why Choose Zabbix?
- Open Source – Zabbix is purely open source and comes at no cost.
- Active Monitoring – You can easily monitor servers, applications and network devices, gathering accurate statistics and performance data
- Enterprise ready – Zabbix has been designed to scale from small environments to large environments
- Capacity Planning – With the data collected by Zabbix, you will be easy to analyze your infrastructure and plan the capacity accordingly.
Zabbix Architecture
Zabbix is distributed monitoring tool with a central web interface. The simple architecture of Zabbix can be composed of three servers.
- Web Server
- RDBMS Server
- Zabbix server
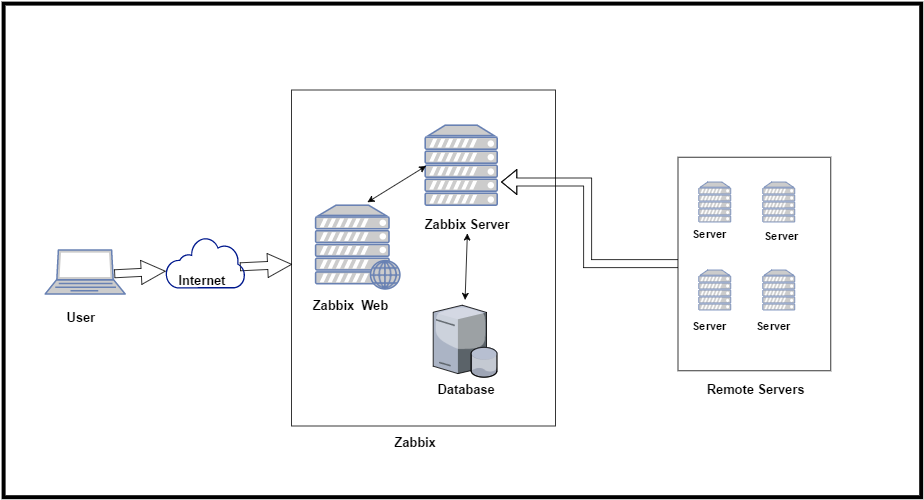
This setup is good enough to handle large environment successfully. It’s better to use the dedicated server for each one of these components.
Zabbix uses client-server architecture and uses an agent in the servers that should be monitored. This agent gathers all needed information and status from the system and sends to Zabbix server. Zabbix version 3 and above support encrypted communication between server and clients.
The Zabbix server can take input data also from a Zabbix sender or Zabbix proxy servers. Zabbix sender is a command line utility to send application performance and availability data to Zabbix servers for processing. Zabbix proxies are used to monitor remote servers. It can collect performance and availability data behalf of Zabbix server and save it in a buffer locally and then send it to Zabbix server. This way the proxy servers can take on itself some of the load and offload the Zabbix servers.
Let us look at some of the terminologies of Zabbix.
- Frontend – Web interface provided with Zabbix
- Zabbix Server – Central server to collect the data and process it.
- Zabbix agent – A process deployed on client servers to monitor locally
- Host – A networked device that should be monitored
- Host group – A logical group of hosts. It is used when assigning access rights.
- Template – A set of entities (items, triggers, applications, low-level discovery rules, graphs, screens, web scenarios) ready to be applied to one or several hosts
- Item – A data that you want to receive from a host
- Trigger – It is a logical expression which defines a threshold
- Event – Occurrence of something that deserves attention
- Action - Predefined way of reacting to an event.
Install and configure Zabbix
Now let’s look at how to install and configure Zabbix 3.0. I’m going to use one Centos 6 machine for all the three components. That are Zabbix Web, Zabbix Server and Database.
Step 1: Disable firewall:
# service iptables stop
# chkconfig iptables off
# service ip6tables stop
# chkconfig ip6tables off
# vim /etc/selinux/config
 SELINUX=disabled
# echo 0 >/selinux/enforce
# reboot
Step 2: Install Mysql on server:
# yum list installed | grep mysql
# rpm -ivh http://dev.mysql.com/get/mysql-community-release-el6-5.noarch.rpm
# yum install mysql-server -y
# yum install vim -y
Step 3: Start Mysql on server:
# service mysqld start
# mysql_secure_installation
"Enter current password for root    (enter for none):   (Press enter)
 Set root password?             [Y/n]:   Y
 New Password          :   Password (Enter your root Password)
 Confirm Password               :   Password (Verify your root Password)
 Remove anonymous users?                [Y/n]:   Y
 Disallow root login remotely?          [Y/n]:   Y
 Remove test database and access to it? [Y/n]:   Y
 Reload privilege tables now?        [Y/n]:   Y
Step 4: Login to mysql:
# mysql -u root -p
# password : Password (Enter your password)
>> CREATE DATABASE zabbix CHARACTER SET utf8 COLLATE utf8_bin;
>> GRANT ALL PRIVILEGES ON zabbix.* TO zabbix@localhost IDENTIFIED BY 'Password';
Step 5: Install PHP on server:
# rpm -ivh http://repo.webtatic.com/yum/el6/latest.rpm
# yum install httpd php56w php56w-gd php56w-mysql php56w-bcmath php56w-mbstring php56w-xml php56w-ldap
# vim /etc/php.ini

 post_max_size=16M
 max_execution_time=300
 max_input_time=300
 date.timezone=Asia/Kolkata
 always_populate_raw_post_data=-1
Step 6: A zabbix user in a group:
# groupadd zabbix
# useradd -g zabbix zabbix
Step 6: Install zabbix on server:
# mkdir /home/zabbix/downloads
# cd /home/zabbix/downloads
# wget https://sourceforge.net/projects/zabbix/files/ZABBIX%20Latest%20Stable/3.2.4/zabbix-3.2.4.tar.gz
# tar xvf zabbix-3.2.4.tar.gz
Step 7: install zabbix database in Mysql:
# cd /home/zabbix/downloads/zabbix-3.2.4/database/mysql/
# mysql -u zabbix -p zabbix < schema.sql
# mysql -u zabbix -p zabbix < images.sql
# mysql -u zabbix -p zabbix < data.sql
Step 8: Configure the source code:
# yum install gcc mysql-community-devel libxml2-devel  unixODBC-devel net-snmp-devel libcurl-devel libssh2-devel OpenIPMI-devel openssl-devel openldap-devel -y
# cd ../..
# ./configure --enable-server --enable-agent --with-mysql --enable-ipv6 --with-net-snmp --with-libcurl --with-libxml2 --with-unixodbc --with-ssh2 --with-openipmi --with-openssl
# make
# make install
Step 9: Edit the Zabbix config file:
# vim /usr/local/etc/zabbix_server.conf

 DBName=zabbix
 DBUser=zabbix
 DBPassword=your_password
Step 10: Configure zabbix:
# mkdir /var/www/html/zabbix
# cd /home/zabbix/downloads/zabbix-3.2.4/frontends/php/
# cp -a . /var/www/html/zabbix/
# chcon -Rv --type=httpd_sys_content_t /var/www/html
# setsebool -P httpd_can_network_connect=1
# setsebool -P zabbix_can_network=1
# chown -R apache:apache /var/www/html/zabbix
# chmod +x /var/www/html/zabbix/conf/
# cp /home/zabbix/downloads/zabbix-3.2.4/misc/init.d/fedora/core/zabbix_server /etc/init.d/zabbix-server
# cp /home/zabbix/downloads/zabbix-3.2.4/misc/init.d/fedora/core/zabbix_agentd /etc/init.d/zabbix-agentd
Step 11: Start services:
# service zabbix-server start
# service zabbix-agentd start
# service httpd start
Step 12: On services on boot time:
# chkconfig httpd on
# chkconfig mysqld on
# chkconfig zabbix-server on
# chkconfig zabbix-agentd on
1. Use the same address you have for your server now and add /zabbix to the URL.
URL : Server-IP/zabbix
>>Next

2. Check for pre-requisites and fix errors if you have any.
>>Next

3. Enter settings to connect to database.
password : Password (Enter the password of Mysql)
>>Next

4.  Enter details to connect to web interface.
Name : 3.0.3
>>Next
>>Finish

5. Connect to the Zabbix web interface with default credentials.
Username: Admin
Password: zabbix
Hope this will help you!
Please Remember me in your prayers!
Enjoy


Comments
Post a Comment